
 September 1, 2020
I was called the other day by someone I know who works with Dynamics 365 (who is not a dev) and wanted to know if they could do some deployment automation by uploading the solution export (.zip) to a Git repository. Not all projects have budgeted to build pipelines for their Dynamics CRM and so just export and import of the solutions manually from one environment to another is usually the process that is adopted.
This is not really the best method for managing your custom solutions. Luckily the Power Platform team has created a ton of guidance which you can review here.
This blog post aims to share how you can go from shipping your solutions manually to using Azure DevOps, store your solutions in Git and leverage Azure Pipelines to manage your solution and deploy them to a testing environment. Once approved, the solution can be deployed to production for your users.
If your Microsoft 365 user account/tenant requires two factor authentication (2FA) then you will have to perform a few extra steps as you will not be able to use a username/password combination when connecting to Dynamics from the Azure Pipeline. In this case we will use an App Registration.
You will need the following to continue:
- Azure DevOps
- Azure Application Registration
- Common Data Service environments (Power Apps)
- Developer Environment
- Just-In-Time (JIT) Build Environment
- Production Environment
- Power Platform Build Tools
Azure DevOps
If you do not have an Azure DevOps account you can sign up for free here. If you already have an account then click on the Sign in to Azure DevOps available on that same page.
In Azure DevOps we’ll assume you have a Team Project with a Git repository. If this is not the case you can follow the steps here to add a Git repository.
The reason we’re asking for a Git repository is because one of the Azure Pipelines we’ll create will extract the solution and put the source into Git.
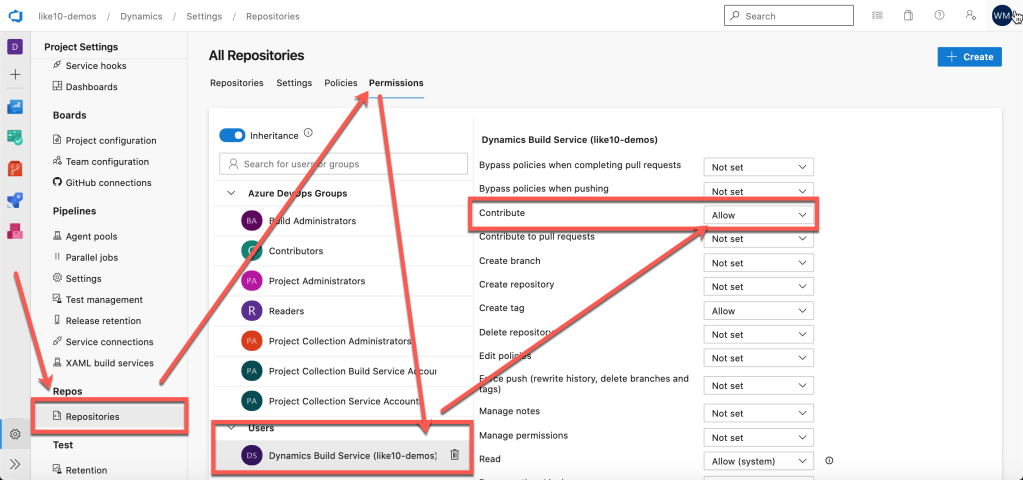
If you want to commit the extracted source of a solution package from within an Azure Pipeline you will have to enable contribute permissions to the project build service user by changing the setting from Not set to Allow. More information is available here.
Azure Application Registration
Please follow the steps in this article to create your application registration in Azure AD.

Once you have your application registration, you must also add it as an Application User by following the steps in this article. Make sure you assign the System Administrator role to this account.
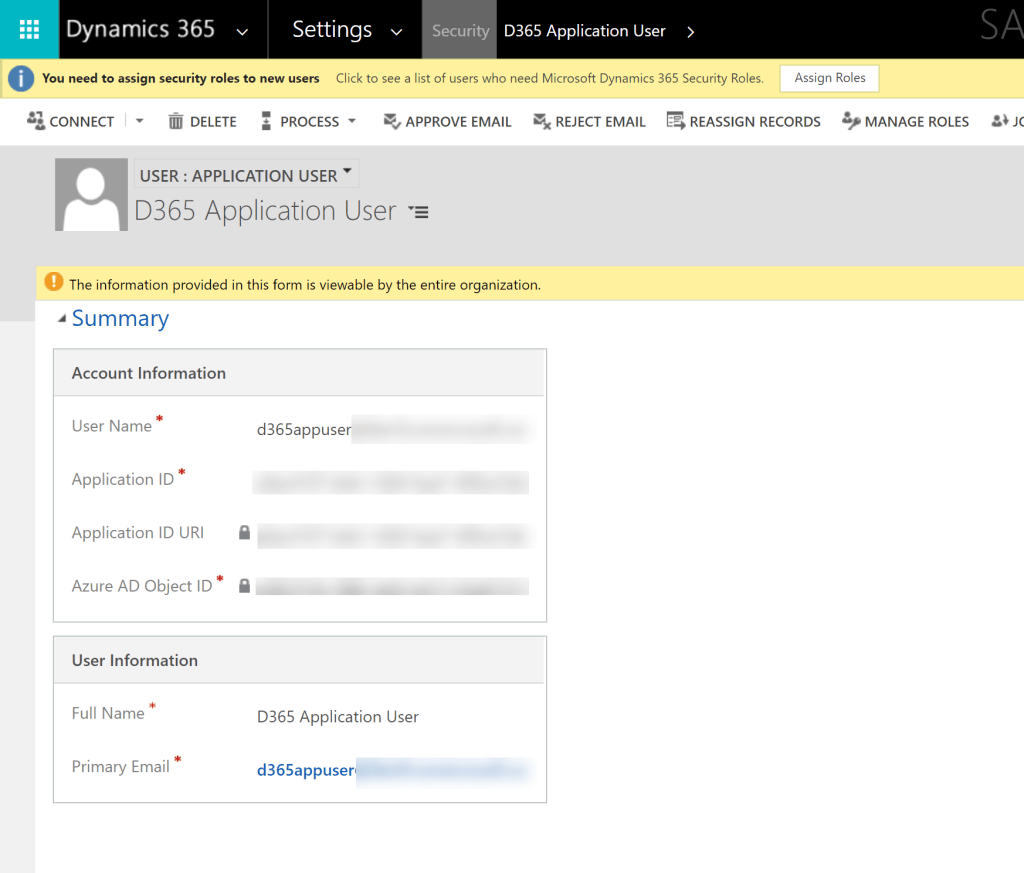
In the example above I am adding the user to my Developer environment (sandbox) but you need to do this to every environment that Azure DevOps will have a service connection and its matching Application User.
Power Platform Service Connections
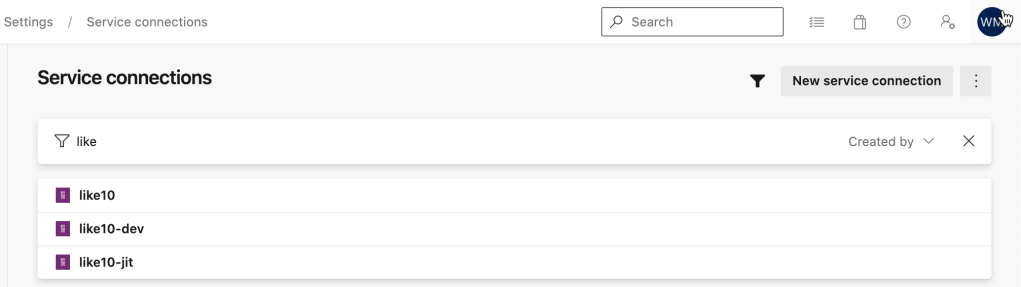
Here are the three (3) service connections I’ve configured in my demo environment which will be used in the various pipeline flows.
The service connection requires the following bits of information
- Server Url
- Tenant ID
- Application ID
- Client Secret
- Service Connection Name
Azure Pipeline (YAML)
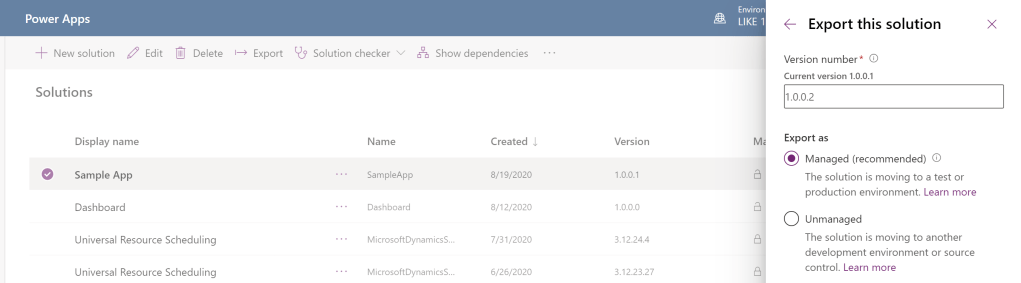
I think we’re ready to build our first Azure Pipeline using YAML to Create an export from Dev and Commit to our repository. In the example below my app is named SampleApp.

# Starter pipeline
# Create Export from Dev

trigger:
- main

pool:
  vmImage: 'windows-latest'

variables:
  GIT_REDIRECT_STDERR: 2>&1
  Version.Revision: $[counter(format('{0:yyyyMMdd}', pipeline.startTime), 0)]
  BuildPlatform: 'Any CPU'
  BuildConfiguration: 'Release'
  MajorVersion: 1
  MinorVersion: 0
  PatchVersion: 0

name: '$(Build.DefinitionName) $(MajorVersion).$(MinorVersion).$(PatchVersion).$(Date:yy)$(DayOfYear)$(Version.Revision)'

steps:
- checkout: self
  clean: true
  persistCredentials: true


- task: PowerPlatformToolInstaller@0
  inputs:
    DefaultVersion: true

- task: PowerPlatformPublishCustomizations@0
  inputs:
    authenticationType: 'PowerPlatformSPN'
    PowerPlatformSPN: 'like10-dev'
- task: PowerPlatformExportSolution@0
  inputs:
    authenticationType: 'PowerPlatformSPN'
    PowerPlatformSPN: 'like10-dev'
    SolutionName: 'SampleApp'
    SolutionOutputFile: '$(Pipeline.Workspace)\Zips\SampleApp.zip'

- task: PowerPlatformUnpackSolution@0
  inputs:
    SolutionInputFile: '$(Pipeline.Workspace)/Zips/SampleApp.zip'
    SolutionTargetFolder: '$(Build.SourcesDirectory)/Solution'

- pwsh: |
   write-host "commit all changes"
   git config user.email "hosted.agent@dev.azure.com"
   git config user.name "Azure Pipeline"
   git checkout $env:Build_SourceBranchName --
   git add --all
   git commit -m "solution source updated by $env:BUILD_BUILDNUMBER [skip ci]"
   write-host "push code to repo"
   git push origin $env:Build_SourceBranchName
  displayName: "Commit changes to Git repo"
If you want to see the pipeline you can head over to this public project hosted in Azure DevOps. I have some other pipeline samples in that project also.
The next pipeline which is important is to build a managed solution from the source that is stored in the repository, this one is packaged as an unmanaged solution first and imported into a Just-In-Time build environment, it is then extracted as a managed solution ready for deployment to your UAT, Pre-Prod and Production environments.
# Build managed solution from git repository
# requires a Just-In-Time (JIT) environment in Power Apps
# umanaged solution is imported and a managed solution
# is exported
# The managed solution is saved as a pipeline artifact
#

trigger:
  - main
  - develop

pool:
  vmImage: 'windows-latest'

variables:
  # Solution Details
  Solution.Name: 'SampleApp'
  Solution.Path: '$(Pipeline.Workspace)/s/Solution'

steps:

- task: PowerPlatformToolInstaller@0
  displayName: 'Power Platform Tool Installer'
  inputs:
    DefaultVersion: true

- task: PowerPlatformPackSolution@0
  displayName: 'Pack Solution from Repository'
  inputs:
    SolutionSourceFolder: '$(Solution.Path)'
    SolutionOutputFile: '$(Build.ArtifactStagingDirectory)\$(Solution.Name).zip'

- task: PowerPlatformImportSolution@0
  displayName: 'Import Solution to JIT Build Environment'
  inputs:
    authenticationType: 'PowerPlatformSPN'
    PowerPlatformSPN: 'like10-jit'
    SolutionInputFile: '$(Build.ArtifactStagingDirectory)\$(Solution.Name).zip'
    AsyncOperation: true
    MaxAsyncWaitTime: '240'

- task: PowerPlatformExportSolution@0
  displayName: 'Export Managed Solution'
  inputs:
    authenticationType: 'PowerPlatformSPN'
    PowerPlatformSPN: 'like10-jit'
    SolutionName: '$(Solution.Name)'
    SolutionOutputFile: '$(Build.ArtifactStagingDirectory)\$(Solution.Name)_managed.zip'
    Managed: true

- task: PublishPipelineArtifact@1
  displayName: 'Publish Artifacts managed and unmanaged solutions'
  inputs:
    targetPath: '$(Build.ArtifactStagingDirectory)\'
    artifact: 'PowerAppSolutions'
    publishLocation: 'pipeline'
Some steps you may want to include during this pipeline execution is to *version* the managed solution, Power Platform Build tools has a task which can put your version string on the app prior to the export.
Hopefully you find this helpful, if you have any questions or I’ve missed something please feel free to leave a comment below.

If possible could you please share the Powershell scripts which you have used for set solution versions in the DevOps pipelines.
LikeLiked by 1 person
You can use the Set Version task in this extension. https://marketplace.visualstudio.com/items?itemName=WaelHamze.xrm-ci-framework-build-tasks here is an example using the PowerPlatform Build Tools in a YAML pipeline https://dev.azure.com/like10-demos/dynamics/_git/SampleSolution?path=/azure-pipelines-build-deploy.yml
LikeLike