
 August 2, 2019
I recently installed Windows Services for Linux V2 (WSL2) and saw a Tech Preview of Docker Desktop WSL 2 posted and was extremely excited to give it a try. If you are interested, read on.
Updated 08/05/2019 – update date/time in WSL2 due to Windows 10 sleep/hibernate
Windows 10 Pro Insider Preview
Get the latest Windows Insider Build, you find out more here on the Quick Start page
Enable WSL (WSL 1.0)
If you do *not* have WSL already configured in Windows 10, you can execute the following command in PowerShell (as Administrator)
Enable-WindowsOptionalFeature -Online -FeatureName Microsoft-Windows-Subsystem-Linux
Open the Microsoft Store and select Ubuntu 18.04 LTS
Enable WSL 2
Execute the following command in PowerShell (as Administrator)
Enable-WindowsOptionalFeature -Online -FeatureName VirtualMachinePlatform
You will have to restart your PC to complete the previous step.
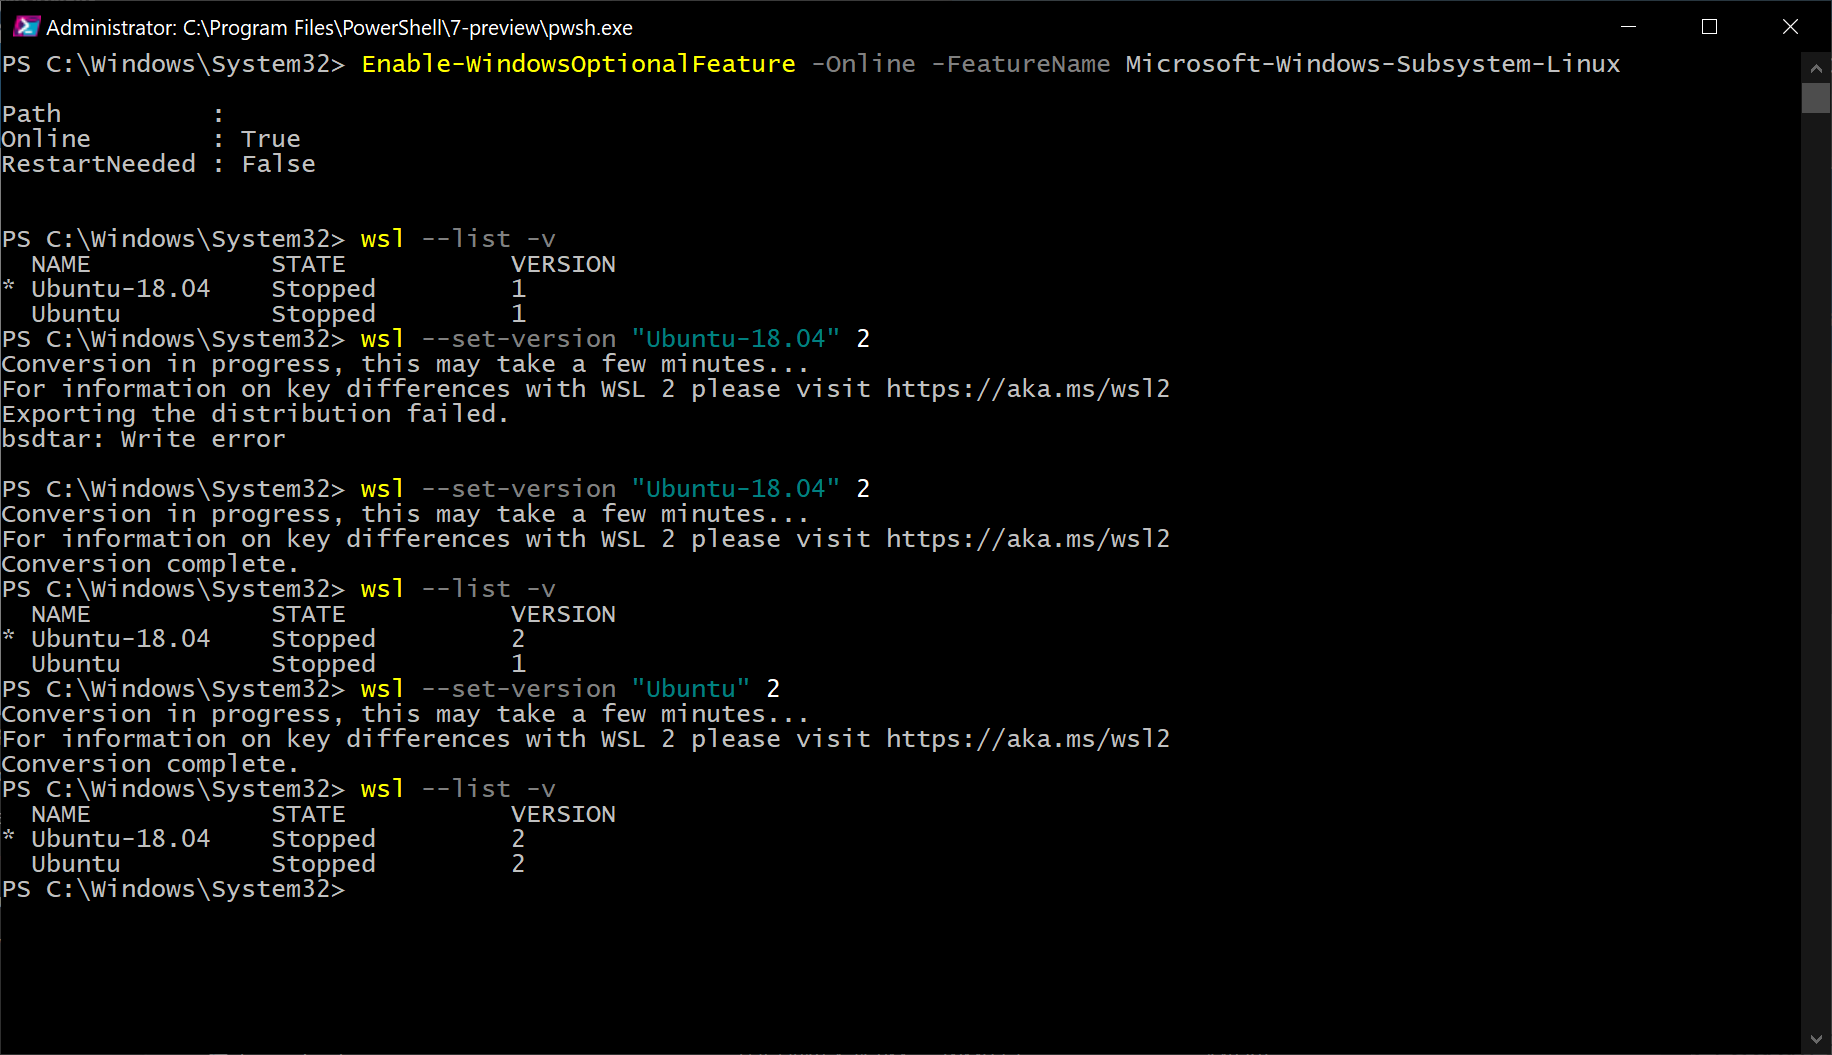
Open a PowerShell command prompt (as Administrator). This first command will list the distributions you have installed with WSL
wsl -- list -v
You should see Ubuntu-18.04 listed and with a Version 1. You can now switch Ubuntu-18.04 to Version 2 by executing the following command:
wsl --set-version "Ubuntu-18.04" 2
You can see from the image below it took me two (2) tries to get that to happen successfully.
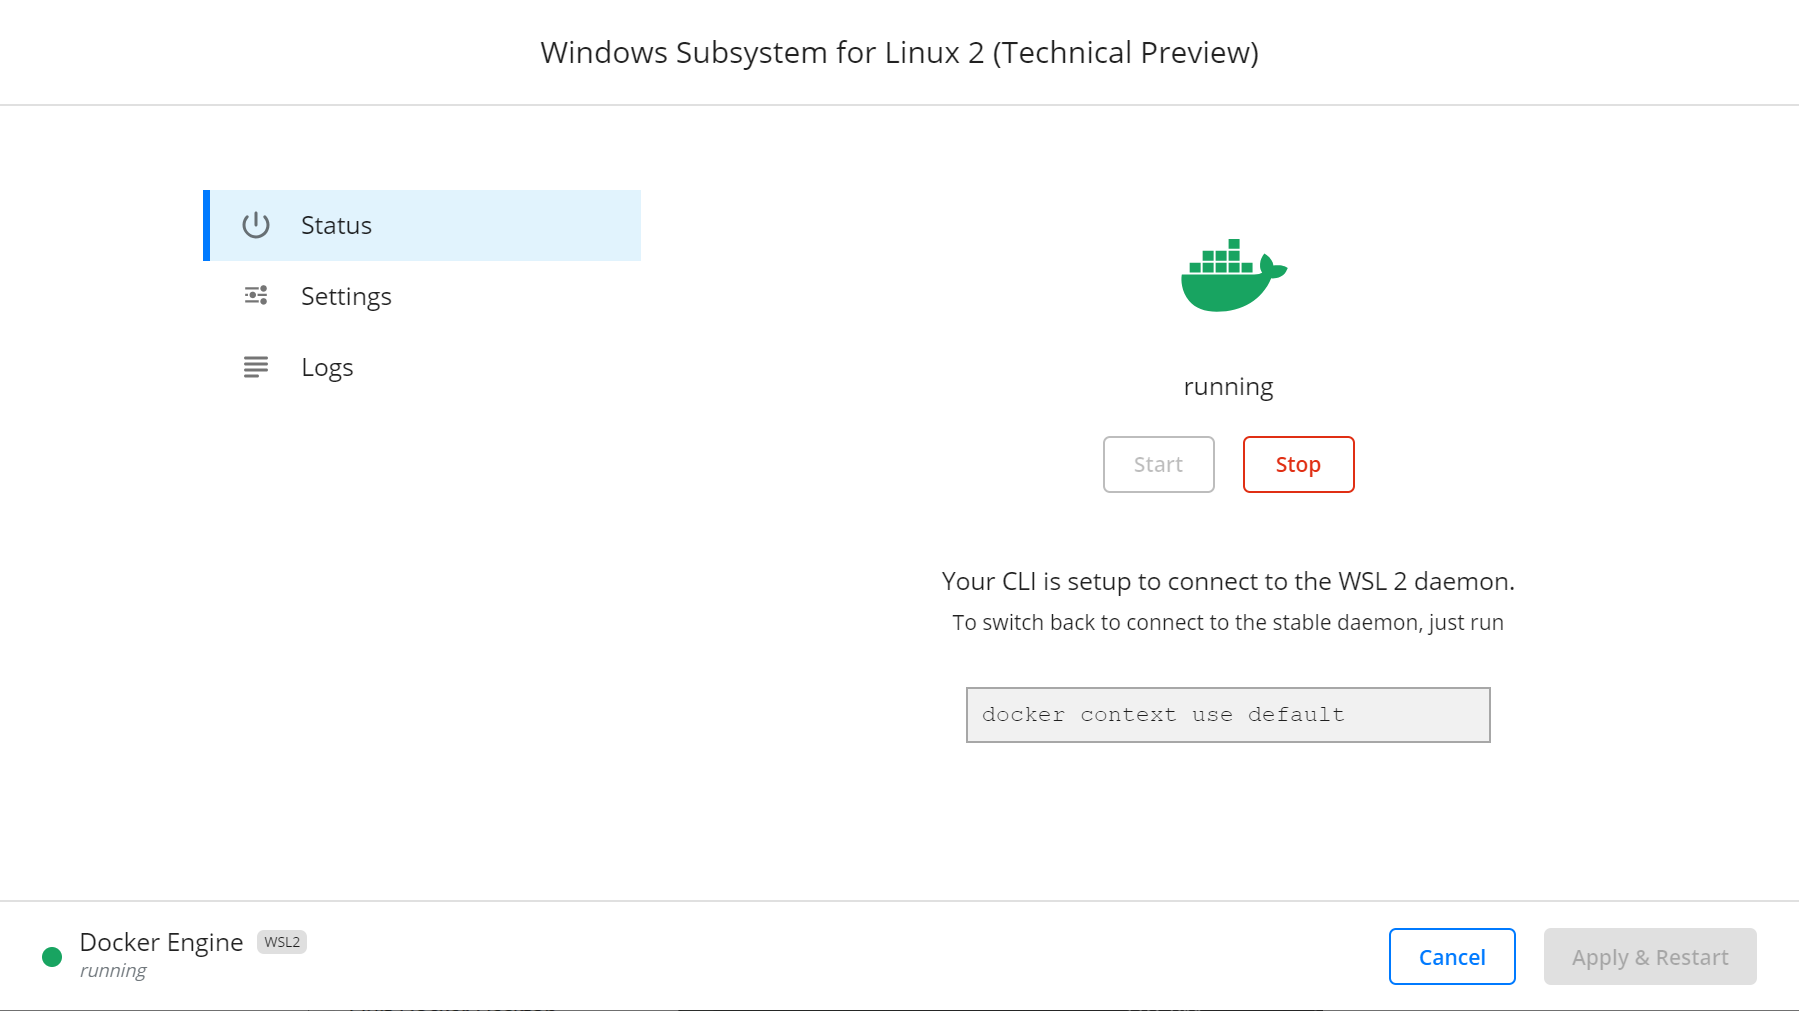
You should now be able to install the Docker Desktop WSL 2 Tech Preview, if you already have a version of Docker installed it will be upgraded to this version.
Once installed you should see the familiar icon in your task bar, Click on the Docker Desktop Icon to display the menu. Select the WSL 2 Tech Preview menu item

Once you click that menu item you will be presented with a dialog to start the daemon running in WSL 2.
Create Docker file
I wanted an excuse to use Visual Studio Code with the new Remote WSL extension and open a folder in WSL. I launched VS Code with the extension installed and chose to open a folder in Ubuntu 18.04


Once you do that you can use VS Code to open your home folder to create a directory and the necessary docker files we need to configure the agent.

Here is the Dockerfile (below) I created, portion of it was obtained from here. The issues I had with that particular configuration is I wanted to use Ubuntu 18.04, compile a .NET core application (which required the sdk) and execute a PowerShell script (which required PowerShell core) as part of the build definition of my .NET Core Web Application.
The Dockerfile was modified to use Ubuntu 18.04, install the dot net core sdk 2.2 and install PowerShell core.
FROM ubuntu:18.04

# To make it easier for build and release pipelines to run apt-get,
# configure apt to not require confirmation (assume the -y argument by default)
ENV DEBIAN_FRONTEND=noninteractive
RUN echo "APT::Get::Assume-Yes \"true\";" > /etc/apt/apt.conf.d/90assumeyes

RUN apt-get update \
&& apt-get install -y --no-install-recommends \
        ca-certificates \
        curl \
        jq \
        git \
        iputils-ping \
        libcurl4 \
        libicu60 \
        libunwind8 \
        libssl1.0.0 \
        libssl1.1 \
        wget \
        software-properties-common \
        netcat

RUN wget -q https://packages.microsoft.com/config/ubuntu/18.04/packages-microsoft-prod.deb -O packages-microsoft-prod.deb
RUN dpkg -i packages-microsoft-prod.deb

RUN add-apt-repository universe
RUN apt-get install apt-transport-https
RUN apt-get update
RUN apt-get install dotnet-sdk-2.2
RUN apt-get install powershell

WORKDIR /azp

COPY ./start.sh .
RUN chmod +x start.sh

CMD ["./start.sh"]
Here is the start.sh file which is exactly what was in the article. I did not have to change this script whatsoever.
#!/bin/bash
set -e

if [ -z "$AZP_URL" ]; then
  echo 1>&2 "error: missing AZP_URL environment variable"
  exit 1
fi

if [ -z "$AZP_TOKEN_FILE" ]; then
  if [ -z "$AZP_TOKEN" ]; then
    echo 1>&2 "error: missing AZP_TOKEN environment variable"
    exit 1
  fi

  AZP_TOKEN_FILE=/azp/.token
  echo -n $AZP_TOKEN > "$AZP_TOKEN_FILE"
fi

unset AZP_TOKEN

if [ -n "$AZP_WORK" ]; then
  mkdir -p "$AZP_WORK"
fi

rm -rf /azp/agent
mkdir /azp/agent
cd /azp/agent

export AGENT_ALLOW_RUNASROOT="1"

cleanup() {
  if [ -e config.sh ]; then
    print_header "Cleanup. Removing Azure Pipelines agent..."

    ./config.sh remove --unattended \
      --auth PAT \
      --token $(cat "$AZP_TOKEN_FILE")
  fi
}

print_header() {
  lightcyan='\033[1;36m'
  nocolor='\033[0m'
  echo -e "${lightcyan}$1${nocolor}"
}

# Let the agent ignore the token env variables
export VSO_AGENT_IGNORE=AZP_TOKEN,AZP_TOKEN_FILE

print_header "1. Determining matching Azure Pipelines agent..."

AZP_AGENT_RESPONSE=$(curl -LsS \
  -u user:$(cat "$AZP_TOKEN_FILE") \
  -H 'Accept:application/json;api-version=3.0-preview' \
  "$AZP_URL/_apis/distributedtask/packages/agent?platform=linux-x64")

if echo "$AZP_AGENT_RESPONSE" | jq . >/dev/null 2>&1; then
  AZP_AGENTPACKAGE_URL=$(echo "$AZP_AGENT_RESPONSE" \
    | jq -r '.value | map([.version.major,.version.minor,.version.patch,.downloadUrl]) | sort | .[length-1] | .[3]')
fi

if [ -z "$AZP_AGENTPACKAGE_URL" -o "$AZP_AGENTPACKAGE_URL" == "null" ]; then
  echo 1>&2 "error: could not determine a matching Azure Pipelines agent - check that account '$AZP_URL' is correct and the token is valid for that account"
  exit 1
fi

print_header "2. Downloading and installing Azure Pipelines agent..."

curl -LsS $AZP_AGENTPACKAGE_URL | tar -xz & wait $!

source ./env.sh

trap 'cleanup; exit 130' INT
trap 'cleanup; exit 143' TERM

print_header "3. Configuring Azure Pipelines agent..."

./config.sh --unattended \
  --agent "${AZP_AGENT_NAME:-$(hostname)}" \
  --url "$AZP_URL" \
  --auth PAT \
  --token $(cat "$AZP_TOKEN_FILE") \
  --pool "${AZP_POOL:-Default}" \
  --work "${AZP_WORK:-_work}" \
  --replace \
  --acceptTeeEula & wait $!

print_header "4. Running Azure Pipelines agent..."

# `exec` the node runtime so it's aware of TERM and INT signals
# AgentService.js understands how to handle agent self-update and restart
exec ./externals/node/bin/node ./bin/AgentService.js interactive
Build the container
Once these file are saved in your WSL 2 environment, open a wsl prompt and change directories into ~/dockeragent and execute the command below to build your Dockerfile
docker build -t dockeragent:latest .
Start the container
Once that command completes we can run our docker container. This will install the latest version of the agent, configure it, and run the agent targeting the default pool of the Azure DevOps service specified on the command line.
docker run -e AZP_URL=<Azure DevOps instance> -e AZP_TOKEN=<PAT token> -e AZP_AGENT_NAME=mydockeragent dockeragent:latest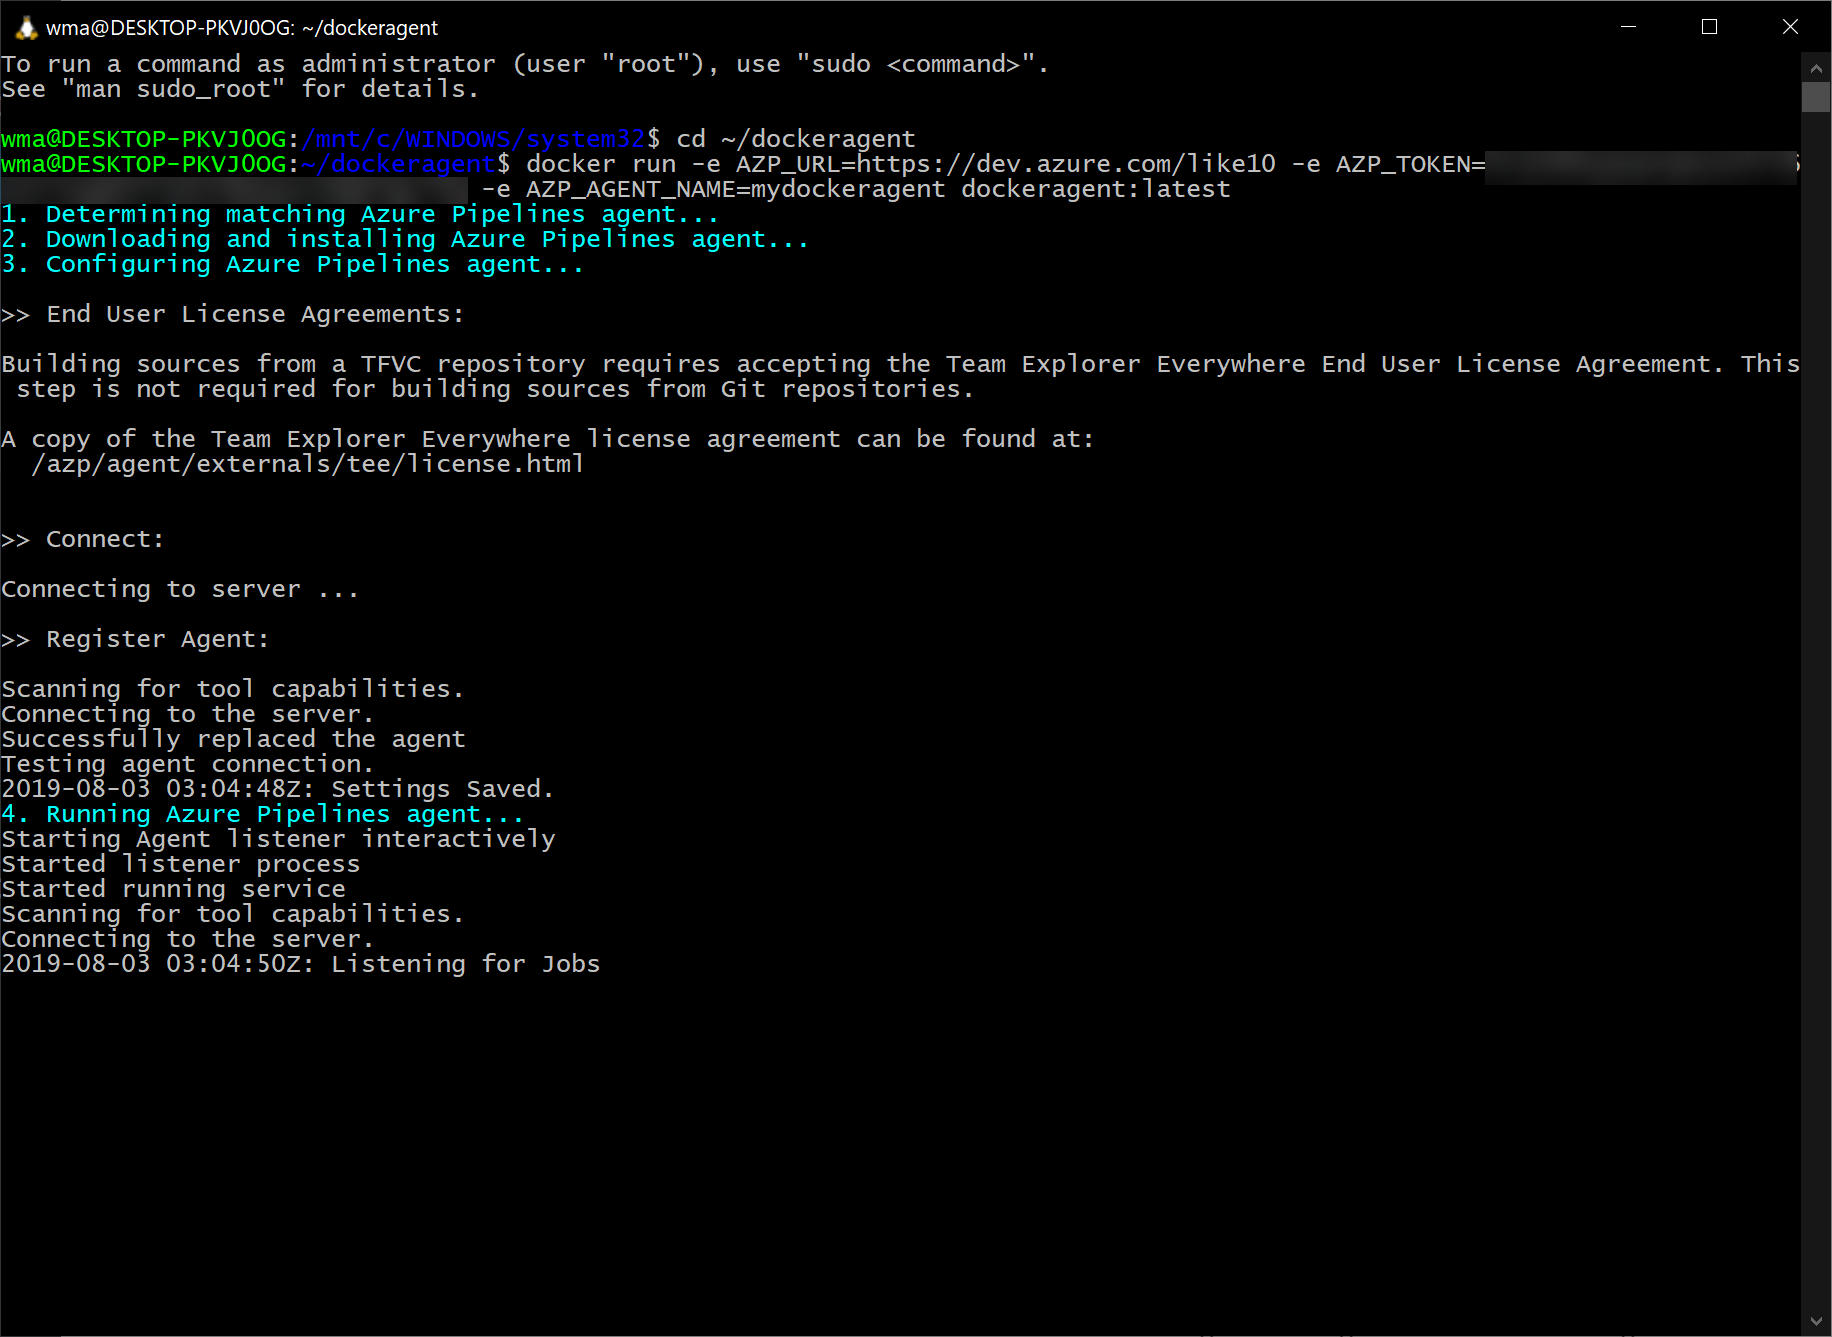
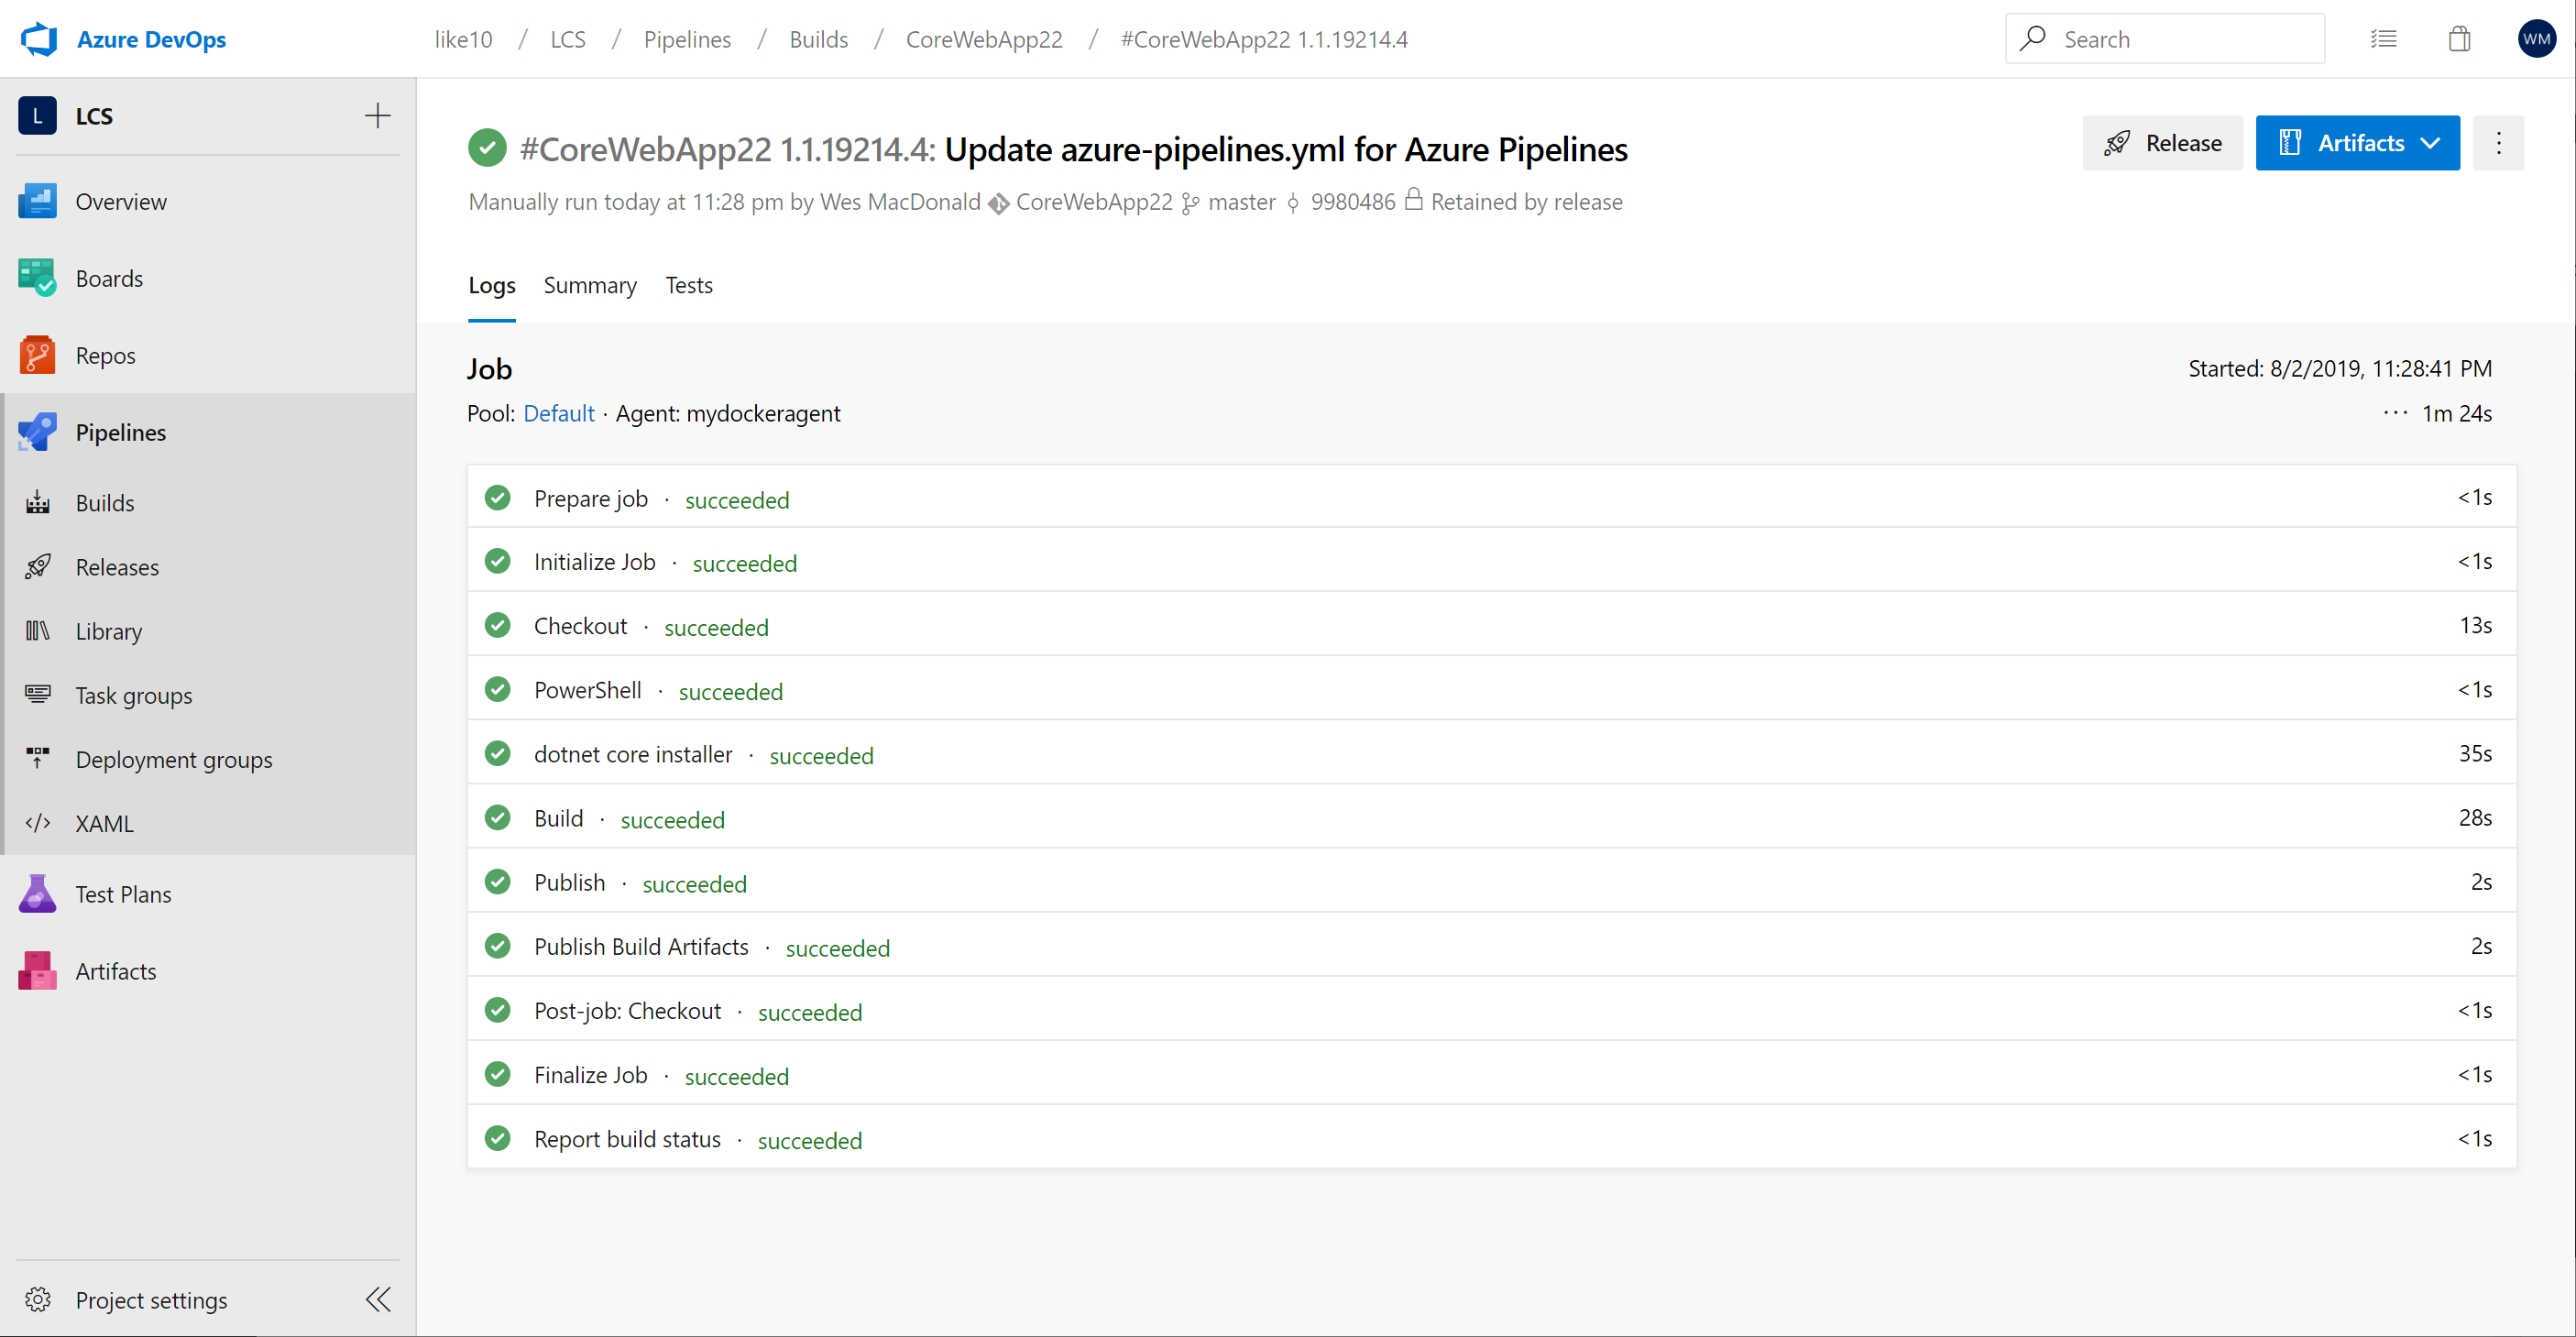
Let’s take the containerized agent for a spin from Azure DevOps, to do this I will trigger a build of my demo ASP.NET Core Web App.

Here is the log of the agent running our build
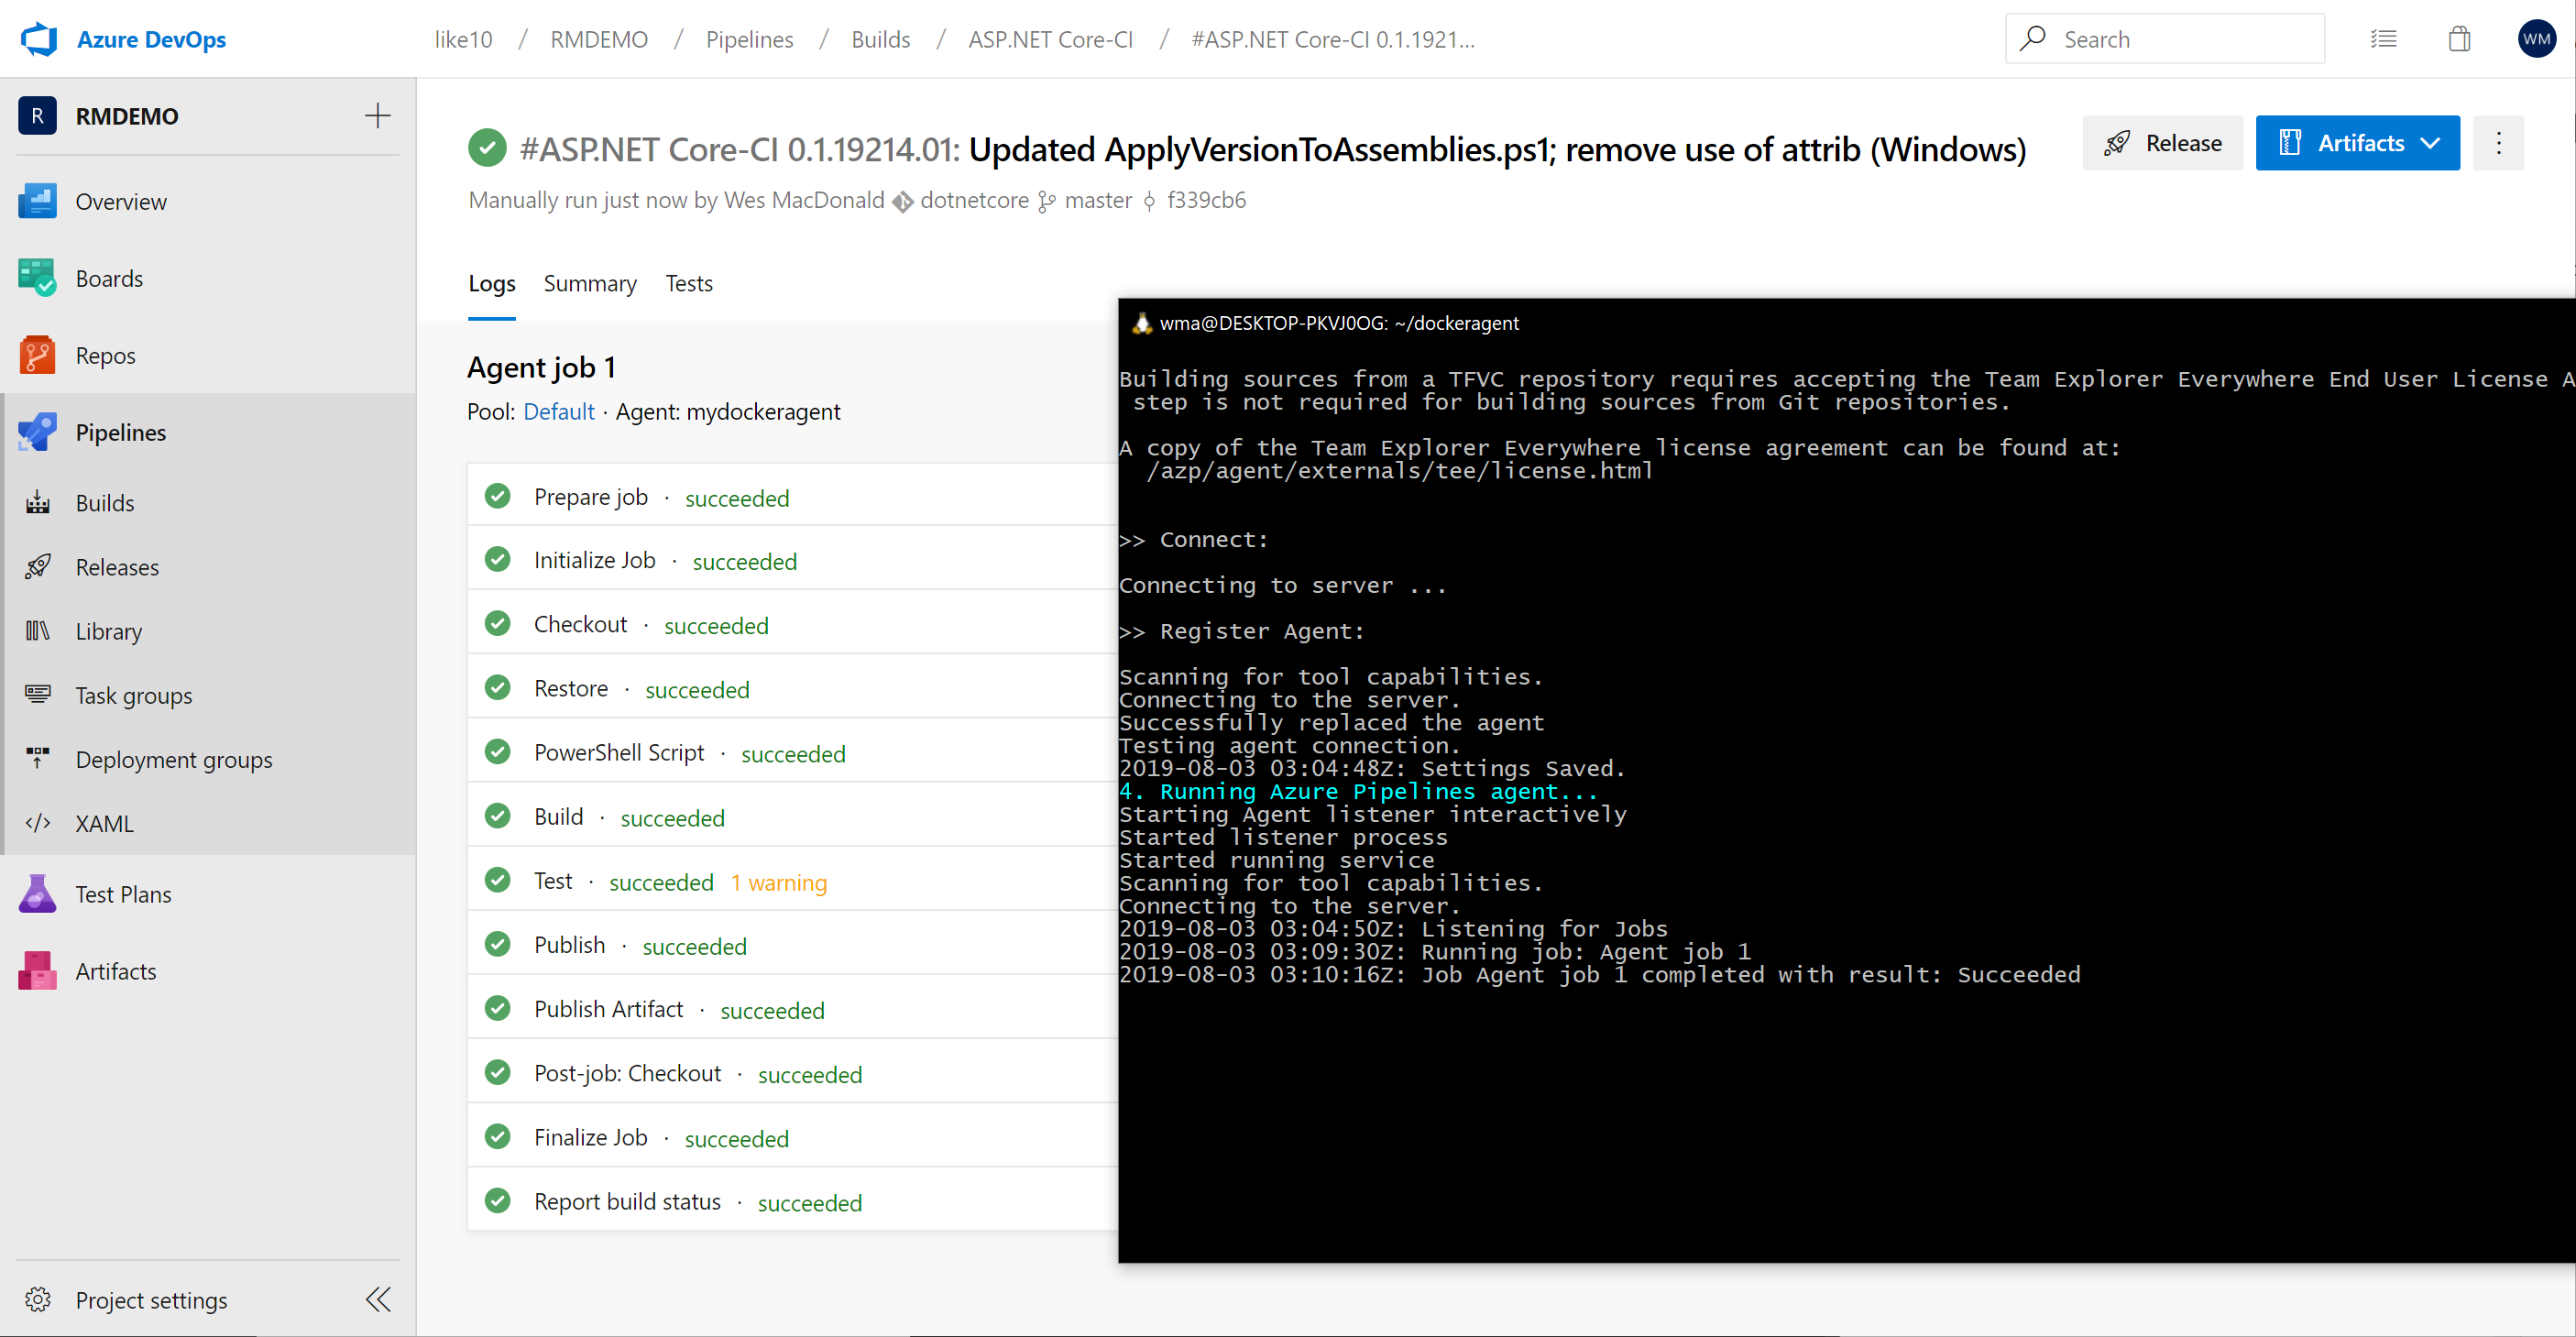
You can also use this agent in your YAML build definition by specifying Default as the pool value

Once you have saved your edits you can trigger another build to verify it is okay. Note you will have to authorize the pool the first time.

I clicked the Authorize resources button and then triggered another build
Hope this is helpful if you are interested in trying out Docker with WSL 2.
UPDATE
If you sleep or hibernate Windows 10 while WSL2 is running your clock will completely be out of sync and the Azure DevOps Agent will fail to start due to the date/time issue.
You can easily update the date/time by issuing the following command
sudo hwclock -s
I discovered this after waking my laptop up to continue working on my container and this blog post.

No comments yet... Be the first to leave a reply!