
 September 18, 2016
To continue from my last post where we published the Test Results, it makes sense I should continue and package the site and create an artifact to use later with Release Management.
I am going to edit the same build definition from the last blog post and add a new Command Line task from the catalogue to execute dotnet publish.

Add Command Line task to perform dotnet publish
Click Add build step… and choose Utility section to get the Command Line task. Click Add and move the task directly under the Publish Test Results task we added previously.
We will set the following values for the Command Line task:
- Tool: C:\Program Files\dotnet\dotnet.exe
- Arguments: publish $(Build.SourcesDirectory)\src\MusicStore –framework $(PublishFramework) –output $(Build.ArtifactStagingDirectory)\publish –configuration $(BuildConfiguration)
- Working folder: $(Build.SourcesDirectory)

Run dotnet publish
I created a variable for PublishFramework and set it to net451 to use in the task above.

Build Definition | Variables
Disable the Publish Symbols Path and Copy Files to: $(build.artifactstagingdirectory) as they are no longer required (part of template). Now save the changes to your build definition and queue a new build.
After approximately 13 minutes you should have a successful build and you can see the results of the dotnet publish command (success) and now we’re ready to create our build artifact.

Run dotnet publish succeeded
Now let’s edit the build definition to grab the folder created as part of the publish. We’ll add a Zip A Folder tasks to package it up nicely.
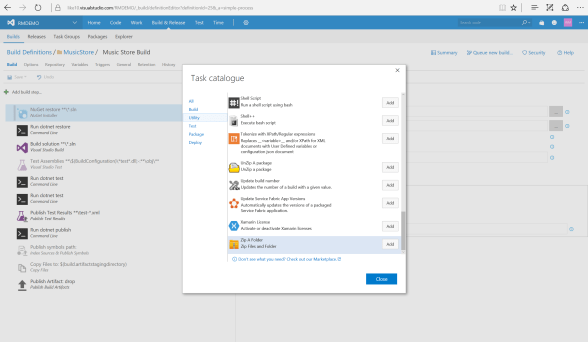
Add the Zip A Folder task immediately after the Run dotnet publish task and set the following values
- Path to folder: $(Build.ArtifactStagingDirectory)\publish
- Path to the zip file: $(Build.ArtifactStagingDirectory)\publish-iis.zip
It should look like this, if you cannot find this task as part of the Release Management Utility tasks. You can install it from the VS Marketplace and install it to use on-premises or VSTS.

Zip A Folder
Now we can edit the Publish Artifact MusicStore task so it picks up the Zip file we created in the previous step. The Publish Artifact task needs to get the zip file, so we’ll set the following values for the task:
- Path to Publish: $(Build.ArtifactStagingDirectory)\publish-iis.zip
- Artifact Name: MuiscStore-Package
- Artifact Type: Server
- Always Run: Not Checked

Publish Artifact: MusicStore-Package
Save the build definition and Queue a new build to add the Zip file as an artifact to your build.
NOTE:
.
If you view the Build Summary and click on the Artifacts link you can explore the MusicStore-Package to view your Zip file.

Artifacts Explorer | View MusicStore-Package
You now have an artifact you can use in your Release Management pipeline.
If you have any comments or feedback on the steps above please let me know.

Thank you for your post Wes. I’m doing almost the same thing here. I have a build step that works just fine, but when I try to run the publish argument, just like you do it in your post I receive the same error: … “does not contain a project.json file”
I don’t have a project.json file, I’m using a .csproj file. Do you have any idea what I can do to solve this?
Thanks in advance.
LikeLike
What type of project are you trying to publish? Is it a ASP.NET or ASP.NET Core and are you using TFS 2017 or VSTS?
Wes
LikeLike