
 January 21, 2018
This post will show one approach you can use for your NuGet with VSTS, I shall show you how you can use the release views in a NuGet Package feed to communicate package quality. Versioning NuGet packages in a Continuous Integration and Delivery (CI/CD) environment has been a topic of discussion and even resulted in a series of blog posts by Matt Cooper from the Package Management team about this very topic (Part 1, Part 2, Part 3).
My good friend and fellow Visual Studio MVP René Van Osnabrugge published a blog post about “Programatically promoting your package quality with Release Views in VSTS”. In the blog post René makes reference to a PowerShell script Set-PackageQuality.ps1 which is published on GitHub to set the Release View for a specific NuGet package, I will be using this as part of the process in this post.
This PowerShell script Set-PackageQuality.ps1 will be added to our project (with a small change) and in the Build Definition we will publish an artifact which includes the script so it can be executed during our release stages.
Where to start?
We can start off easy by creating the package feed itself in VSTS and specify the release views to designate the package quality.
Create a package feed
Open your favourite browser and navigate to your team project in TFS or VSTS. On the Build and Release drop down menu select Packages

Build and Release | Packages
If you have no feeds previously configured, click Create new feed otherwise use the drop down menu of the current feed and select New feed
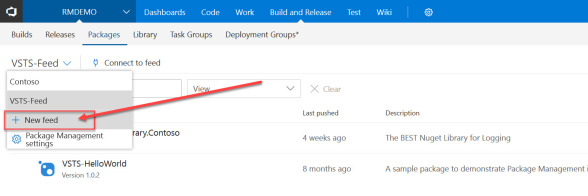
Packages | New feed
On the New feed page you will need to provide the following information:
- Name
- Visibility (who can use the feed)
- Upstream Sources (Use and save open source packages)

Create new feed
I have set the following options for this feed:
- Name: H2K
- Visibility: Account
- Upstream sources: Only use packages published to this feed
Click the Create button to create the new feed with the options selected. You should have an empty feed displayed in the browser window.

Connect to the feed to get started
Configure the package feed
We will be using release views to communicate the package quality and so we need to have a view for each of our stages.

Edit feed
Click the gear icon (Edit feed) located on the far-right side. On the Feed settings page click on the Views tab, you will notice you have two views already created named:
- Prerelease
- Release
We are going to add two additional views named as follows:
- CI
- Beta

Feed settings | Views | Add a new view
Click on Add view and enter CI as the name then click Add
Click on Add view a second time and enter Beta as the name, then click Add.

Views | Save
Click the Save button to preserve your changes. Once your changes are saved you will notice the Save button is greyed out.

Views | Saved
These Views will be used by the Release Definition as we push our NuGet package through the different environments/stages in our pipeline. You cannot publish a package to a view, only to a feed, we will use the REST APIs to promote a package-version into a specific view. This is where the Set-PackageQuality PowerShell script will come in to play. The default view in Feed Settings is Release, we will update the default to CI and click Save.
Visual Studio NuGet Feed Configuration
Click on Connect to feed button in the Packages tab, click on the Copy to clipboard button to copy the Package source URL. The default view is for All packages, here is the URL for all H2K packages:
https://like10.pkgs.visualstudio.com/_packaging/H2K/nuget/v3/index.json
If I select the Prerelease view the URL will include the view name:
https://like10.pkgs.visualstudio.com/_packaging/H2K@Prerelease/nuget/v3/index.json
Note the @viewName after the feed name.
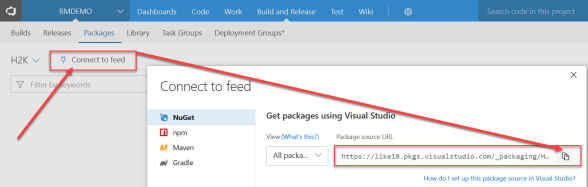
Connect to feed
- Launch Visual Studio
- On the Tools menu, select Options…
- Expand the NuGet Package Manager node on the left and select Package Sources.
- Click the green plus in the upper right corner.
- At the bottom of the dialog, enter a name H2K (CI) and put the URL for the CI view
https://like10.pkgs.visualstudio.com/_packaging/H2K@CI/nuget/v3/index.json
into the source field you copied from the Connect to feed - Click the Update button
- Repeat the above steps adding your Release view this time.
- Click OK
Create .nuspec for your NuGet Package
In this case we want a NuGet package for our C# Library, if you want a Nuget package for a C++ Library (native) it is configured a bit differently but that is outside the scope of this post. I recommend you take a look at the following links to get started building NuGet packages.
In order to create a NuGet package we must define a .nuspec file which contains the information about the files we need to package up. If you aren’t familiar with the structure of a NuGet package I recommend you get the following to assist you:
- Install the NuGet CLI tool by downloading the latest version of nuget.exe here.
- Download a copy of the NuGet Package Explorer from GitHub here.
You can execute nuget spec from a command line to create an empty manifest (.nuspec) file which you can customize.
<?xml version=”1.0″?>
<package>
<metadata>
<id>$id$</id>
<version>$version$</version>
<title>$title$</title>
<authors>$author$</authors>
<owners>$author$</owners>
<licenseUrl>http://LICENSE_URL_HERE_OR_DELETE_THIS_LINE</licenseUrl>
<projectUrl>http://PROJECT_URL_HERE_OR_DELETE_THIS_LINE</projectUrl>
<iconUrl>http://ICON_URL_HERE_OR_DELETE_THIS_LINE</iconUrl>
<requireLicenseAcceptance>false</requireLicenseAcceptance>
<description>$description$</description>
<releaseNotes>Summary of changes made in this release of the package.</releaseNotes>
<copyright>Copyright 2018</copyright>
<tags>Tag1 Tag2</tags>
</metadata>
</package>
Here is the contents of the ContosoLogger.Library.nuspec file I am using for my sample library project.
<?xml version=”1.0″ encoding=”utf-8″?><package xmlns=”http://schemas.microsoft.com/packaging/2011/08/nuspec.xsd”><metadata><id>ContosoLogger.Library</id><version>1.0.0</version><title>ContosoLogger.Library</title><authors>Wes MacDonald</authors><owners>Contoso Corporation</owners><requireLicenseAcceptance>false</requireLicenseAcceptance><description>The BEST NuGet Library for Logging</description><releaseNotes>Summary of changes made in this release of the package.</releaseNotes><copyright>Copyright 2018 (c) Contoso Corporation. All Rights Reserved.</copyright><tags>Logger Logging Logs</tags></metadata><files><filesrc=”bin\Release\netstandard1.3\ContosoLogger.Library.dll”target=”lib\netstandard1.3\ContosoLogger.Library.dll”/></package>
Create Build Definition to build (pack) NuGet Package

Choose a template | Start with an Empty process
We will add the required tasks to the build definition and then configure other settings in the build.

Phase 1 – Add a task to the phase
In our Empty process we will start by adding the following tasks to Phase 1
- PowerShell
- Visual Studio Build
- NuGet
- Copy Files
- Publish Build Artifacts
PowerShell
This PowerShell task executes ApplyVersionToAssemblies.ps1 which injects our version number from the Build into the AssemblyInfo.cs file in the project. The Build number format is defined as follows in the Build Definition under Options:
$(BuildDefinitionName) $(MajorVersion).$(MinorVersion).$(Year:yy)$(DayOfYear)$(Rev:.rr)
The Build Number Format relies on two (2) variables defined in the Build Definition. In this case we add the following value pairs:
- Name: MajorVersion Value: 0
- Name: MinorVersion Value: 1

Build properties | Build number format

Process variables | MajorVersion and MinorVersion
Visual Studio Build
This task builds the solution your project is in, select the Solution, Visual Studio Version required for your project; The Platform and Configuration should already be populated. Note: If you select Visual Studio 2017 as the version make sure you also select the Hosted VS2017 Agent Queue under process if you are using the Hosted Agents on VSTS.

Visual Studio Build
NuGet
This is the Nuget task, we must select the “pack” command from the Command dropdown. We must also pass the path to the .nuspec file we created earlier, the Configuration to package $(BuildConfiguration) and Package folder $(Build.ArtifactStagingDirectory). Expand Pack options, in the Automatic package versioning dropdown select Use the build number.

NuGet pack
Copy Files
This task copies the Set-PackageQuality.ps1 script we added to version control earlier to the output folder $(Build.ArtifactStagingDirectory). This script will be used to set the view for the package as it moves through the pipeline stages we will configure.

Copy Set-PackageQuality.ps1
Publish Build Artifacts
This task publishes our artifact which at the moment consists of a NuGet package (created by the NuGet Pack task) and the PowerShell script (Set-PackageQuality.ps1).

Publish Build Artifacts
Queue New Build
Save the Build Definition you’ve created and Queue new build. Once the build is completed we can take a look at the results of the NuGet Pack task to see if our package was created successfully and fix any errors or warnings.

NuGet Pack Task Log
We also want to very we have all of our artifacts in place, on the Build, then click Artifacts we can explore the contents of the published build artifacts.

Artifacts Explorer
With the Build Definition completed and the Artifacts ready we can go ahead and create a Release Definition which consumes the artifacts and has environments that reflects the views we created in the NuGet feed earlier
Create Release Definition to Set Package Quality
We need to create a release pipeline that reflects the package quality so with environments in combination with the release views we can move a NuGet package through the pipeline without having to change its version.
In the NuGet feed options we created Release Views which we will use to name environments in the release definition. Go to the Build and Release hub, click on Releases, click the + (plus symbol) and click Create release definition.

Create release definition
You will be in a New Release Definition and provided an option to select a template for the first environment “Environment 1” of the release.

New Release Definition | Select a Template
We will not select any of the existing templates, click on Empty process to proceed.

We are going to name this environment CI to reflect the same name as our first NuGet feed release view. Type CI into the Environment name field and then click the X in the top right corner of that window.
Click Add and then select New environment, in the option to select a template click Empty Process. In the environment dialog type Beta in the Environment name field and then click the X in the top right corner of the window.

Environments | New environment
Do this step two more times and name the environments Prerelease and Release. You should now have a release definition which looks like the image below

Environments
We have added an environment to reflect each of our release views in the NuGet feed, now we must link the build Artifact with the NuGet package and PowerShell script. Click on Add in the Artifacts section and select the Build Definition we created earlier. If you have not triggered a build which produced an artifact for the selected Build Definition you will see a warning displayed in the Add artifact dialog. Click on Add after you have filled in the fields.

Add artifact
Click on the Tasks drop down and select CI

New Release Definition | Tasks | CI
You will be presented with an empty Agent phase, click on the + to the right of Agent phase

We will be adding two (2) tasks to the CI environment, the following:
- NuGet
- PowerShell
The NuGet task will be doing the push of our package to our NuGet feed created earlier, we only require the NuGet task in the first environment.

NuGet push
For the Set-PackageQuality.ps1 PowerShell script to execute successfully we must also enable the option Allow scripts to access OAuth token which is located under the Agent phase

Agent phase | Allow scripts to access OAuth token
The PowerShell task will be setting the package quality by configuring the release view of the package. Here is the PowerShell task, this step executes the Set-PackageQuality.ps1 PowerShell script and put our package into the correct release view.

PowerShell task | Set-PackageQuality.ps1
The Set-PackageQuality.ps1 script requires the following arguments:
- feedName
- packageId
- packageQuality
This is the only task we will need in the other environments, the only parameter being changed will be packageQuality which will align with the release view. We are passing $(Release.EnvironmentName) to the packageQuality parameter.
The other environments Beta, Prerelease and Release will only have the PowerShell task configured, NuGet push can only be executed once for each version of a package which is done in the CI environment. Note: Make sure you also enable the option Allow scripts to access OAuth token which is located under the Agent phase of each environment.

Agent phase | Set-PackageQuality.ps1
We must also configure the Options for the Release Definition and specify a Release name format of Release-$(Build.BuildNumber)$(rev:r).

Release name format
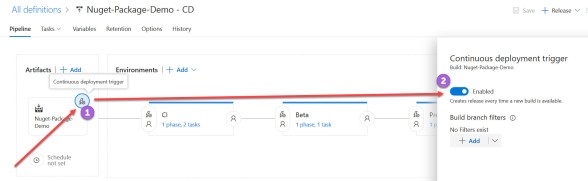
The last configuration change is to enable the Continuous deployment trigger so all builds of the package get picked up immediately and pushed to the NuGet feed and put in the CI release view.
Continuous deployment trigger
We need to configure a Pre-deployment approval for each of the Beta, Prerelease and Release environments otherwise the package will be pushed through all of the environments immediately after a build is executed.

Pre-deployment conditions
Click Save on the Release Definition. If we Queue new build for which this Release Definition will be triggered we should see our package in the CI environment shortly after the build is completed.

Build Summary | Deployments
If we look at the Release Summary we can see the package is deployed to the CI view.

Release Summary
Note: A package can only be in one (1) view, if we take a look at the CI view from Visual Studio we will see the package.

NuGet Package Manager
This is one method for managing your NuGet packages if you have any feedback please feel free to leave a comment below.

if the nuget package is moved from preview to release it is removed from preview view.
How can this disappearance of a package be handled in a project which reference exactly this prerelease version and which does not allow to use a higher / released version of the package – eg. you need to rebuild an older version of a project for verifying an issue ?
LikeLike
Hi Daniel,
While it does disappear from the view it does not disappear from the All Packages view which shows all versions.
You do raise a very good point.
Cheers,
Wes
LikeLike
Thanks for the nice article that is a little updated from the original series by Matt Cooper. You mention the required parameters for for Set-PackageQuality but I didn’t see a mention of the PackageVersion param from the script. It seems that the API is requiring this otherwise gives a 404. While I use slightly different versions for packages, I’m not seeing how it’s being set without explicitly defining it. Is this somehow being interjected for you based on your BuildNumber or ReleaseName options?
Also can you comment a little more about how you use your different environments. i.e. What is the significance of Beta vs Prerelease for you?
LikeLike
Hi Matt,
I actually modified the parameters for the Set-PackageQuality.ps1 script to get the version string from the Build Number
param
(
[ValidateSet(“nuget”,”npm”)][string] $feedType = “nuget”,
[string] $feedName=””,
[string] $packageId=””,
[string] $packageVersion=[regex]::matches($Env:BUILD_BUILDNUMBER, “\d+\.\d+\.\d+\.\d+”),
[string] $packageQuality=””,
[switch] $pester
)
In regards to the views this is to represent the same verticals we would normally move application code through (Dev, Test, PreProd and Prod). I am preparing another post where instead of moving a package through the views I push a new package into each view using a SemVer 1.0 and SemVer 2.0 naming format. Something like 1.0.0-alpha, 1.0.0-beta, 1.0.0-prerelease and 1.0.0
Thanks,
Wes
LikeLike
Hi Wes,
first of all, thank You for this article. It helped me to get started with TFS and Nuget.
I have my local TFS instance and I struggling with Releases. I’ve completed all the steps You shown, but when calling Set-PackageQuality.ps1 I get this error:
Invoke-RestMethod : The remote name could not be resolved: ‘http’
I’m not sure what might be the problem of this.
I say is script that there are two global variables:
$account = ($env:SYSTEM_TEAMFOUNDATIONSERVERURI -replace “https://(.*).visualstudio.com/”, ‘$1’).split(‘.’)[0]
$basepackageurl = (“https://{0}.pkgs.visualstudio.com/DefaultCollection/_apis/packaging/feeds” -f $account)
Should I change them to target my local TFS server?
Do You have plans to release that article about SemVer?
Bets regards,
Tomasz
LikeLike
I have the same issue…any tips for this?
LikeLike
What is your issue?
LikeLike
When calling Set-PackageQuality.ps1 on my local TFS instance I get this error:
Invoke-RestMethod : The remote name could not be resolved: ‘https’
It should be because of the two variables
$account = ($env:SYSTEM_TEAMFOUNDATIONSERVERURI -replace “https://(.*).visualstudio.com/”, ‘$1’).split(‘.’)[0]
$basepackageurl = (“https://{0}.pkgs.visualstudio.com/DefaultCollection/_apis/packaging/feeds” -f $account)
not properly set for TFS 2018.
I cannot find any documentation on how to call the REST api for updating the package version for TFS on premise version.
Any help would be highly appreciated.
Thanks
Luigi
LikeLike
What is the URL of your TFS server? If it’s not using https replace the above with http. Replace VisualStudio.com with the domain of your TFS server.
Note: I have not tried this on my demo on-premises farm.
Wes
LikeLike
Thanks very much… it worked.
For anyone reading, I have just deleted the $account variable and modified the $basepackageurl as follows
$basepackageurl = (“https:///DefaultCollection/_apis/packaging/feeds”)
Thanks again
Luigi
LikeLiked by 1 person
$basepackageurl = (“https://mytfsdomain/DefaultCollection/_apis/packaging/feeds”)
LikeLike
Hi Wes,
Nice article pulling together the whole end to end and much furthering the initial TFS Blogs about this in 2016.
My confusion is still around View usage in Visual Studio and projects as they as supposed to target just one feed, and views appear as different Feeds.
For example, using GitFlow approach, i might have a package first produced in a Feature branch. It would get published to the default view of my Feed (@local) with a semvar pre-release suffix to the name such as 1.0.0-featurexyz-build123. When this eventually merged back to develop, a new build and publish would occur, at which point i could keep the suffix determining it as pre-release, e.g. 1.0.0-develop-build123. Say I now branch to a release branch, rebuild, and publish the package as 1.0.0 with no suffix. If i now promote this to @release view, any projects that are referencing my main feed @local view, in their nuget config, will not see that this is also in the @release view without having to target that view specifically. Of course they will report this as a stable version though, as VS by default differentiates between versions with and without a suffix.
I think i’m missing something with the Views approach – is the intention of Views to remove the need to have to manipulate the suffix when handling internal packages, so that certain teams can only target Release and ignore everything in between?
If so is there any need for this internally in a basic environment where i have say 2 repos, one producing tools that another project in the 2nd repo consumes? But they’d want to target a single feed giving the choice of the tools versioning as it moves between branches.
Bit of an essay, but i hope it makes sense. Thanks in advance,
Steve
LikeLike